Evening photography can produce dramatic results, although it has its challenges. Here are some examples from Venice, Rome and Tuscany.
Earlier I promised some evening shots to complement my early morning photographs of Venice. Evening photography has the same main benefit as dawn, which is to say warmer light and lower contrast. In fact, sometimes the atmospheric haze at the end of a long day (natural or from pollution) can produce more pleasing colours than in the clarity of dawn.
Another advantage over dawn photography is not having to set the alarm clock. The disadvantage, of course, is that there will usually be many more people about. So bridges and waterfronts are good places to be to try and avoid having people wander through your shot.
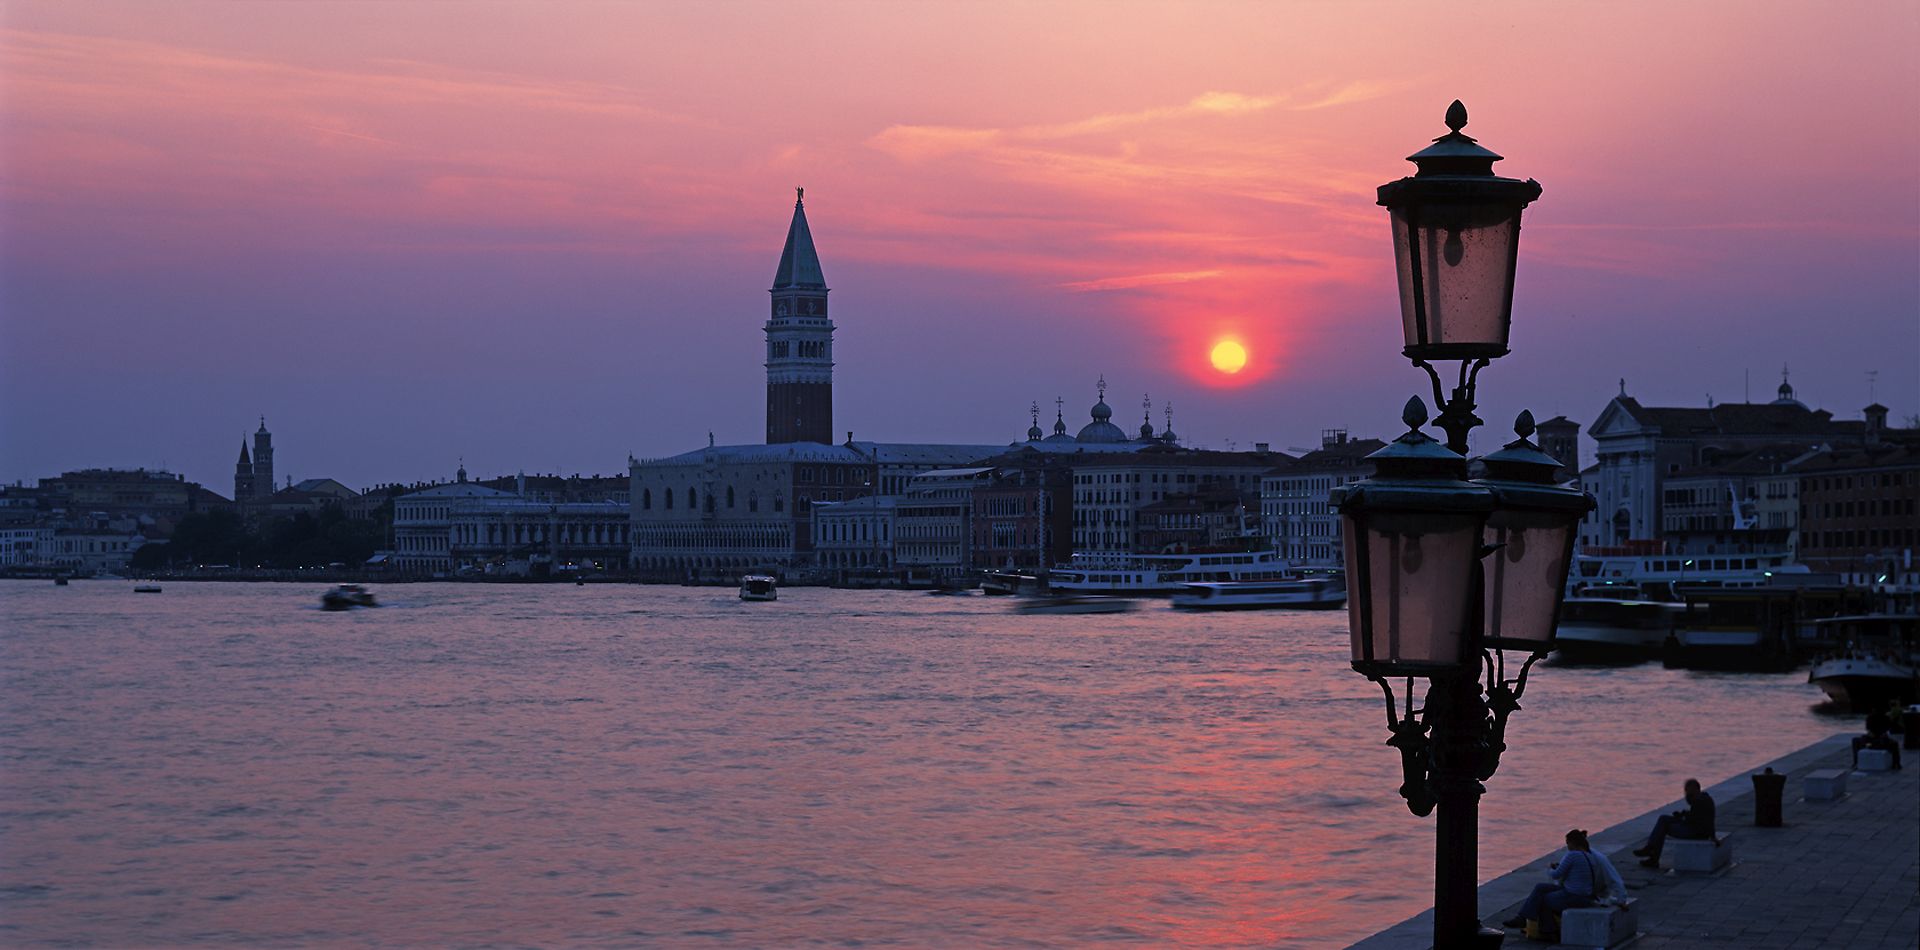
Getting the exposure right can be tricky – even if your camera has the very latest algorithms to calculate exposure, it won’t always get it right. For much of my photography life, I did not use cameras with automatic exposure, but found that a good result could usually be obtained by using a hand-held spot meter on a point just to the side of the setting sun. For the photograph above I metered on a point about halfway between the sun and the belltower in Piazza San Marco. For the photograph below I metered from the clouds in the centre, just above the trees.
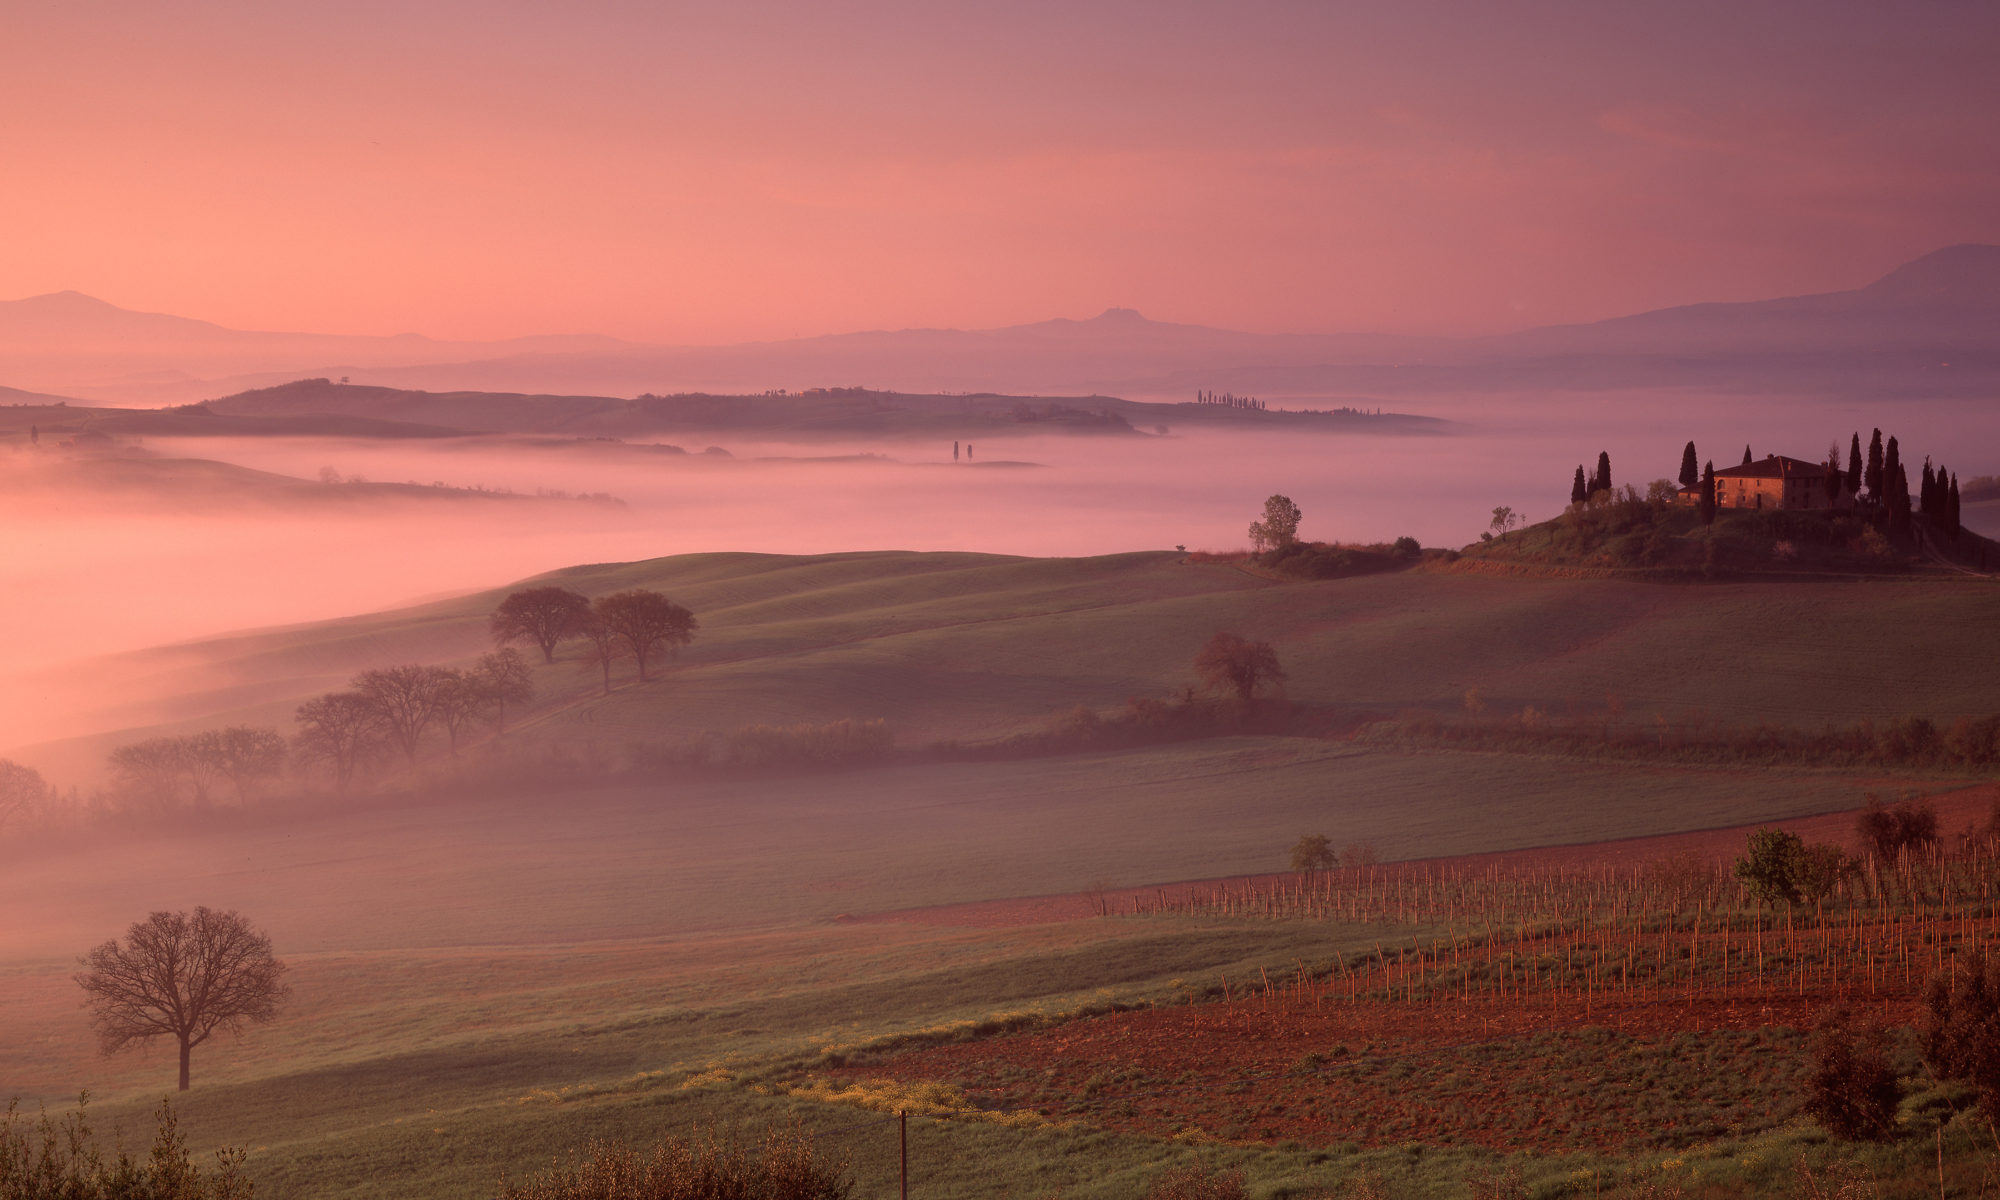
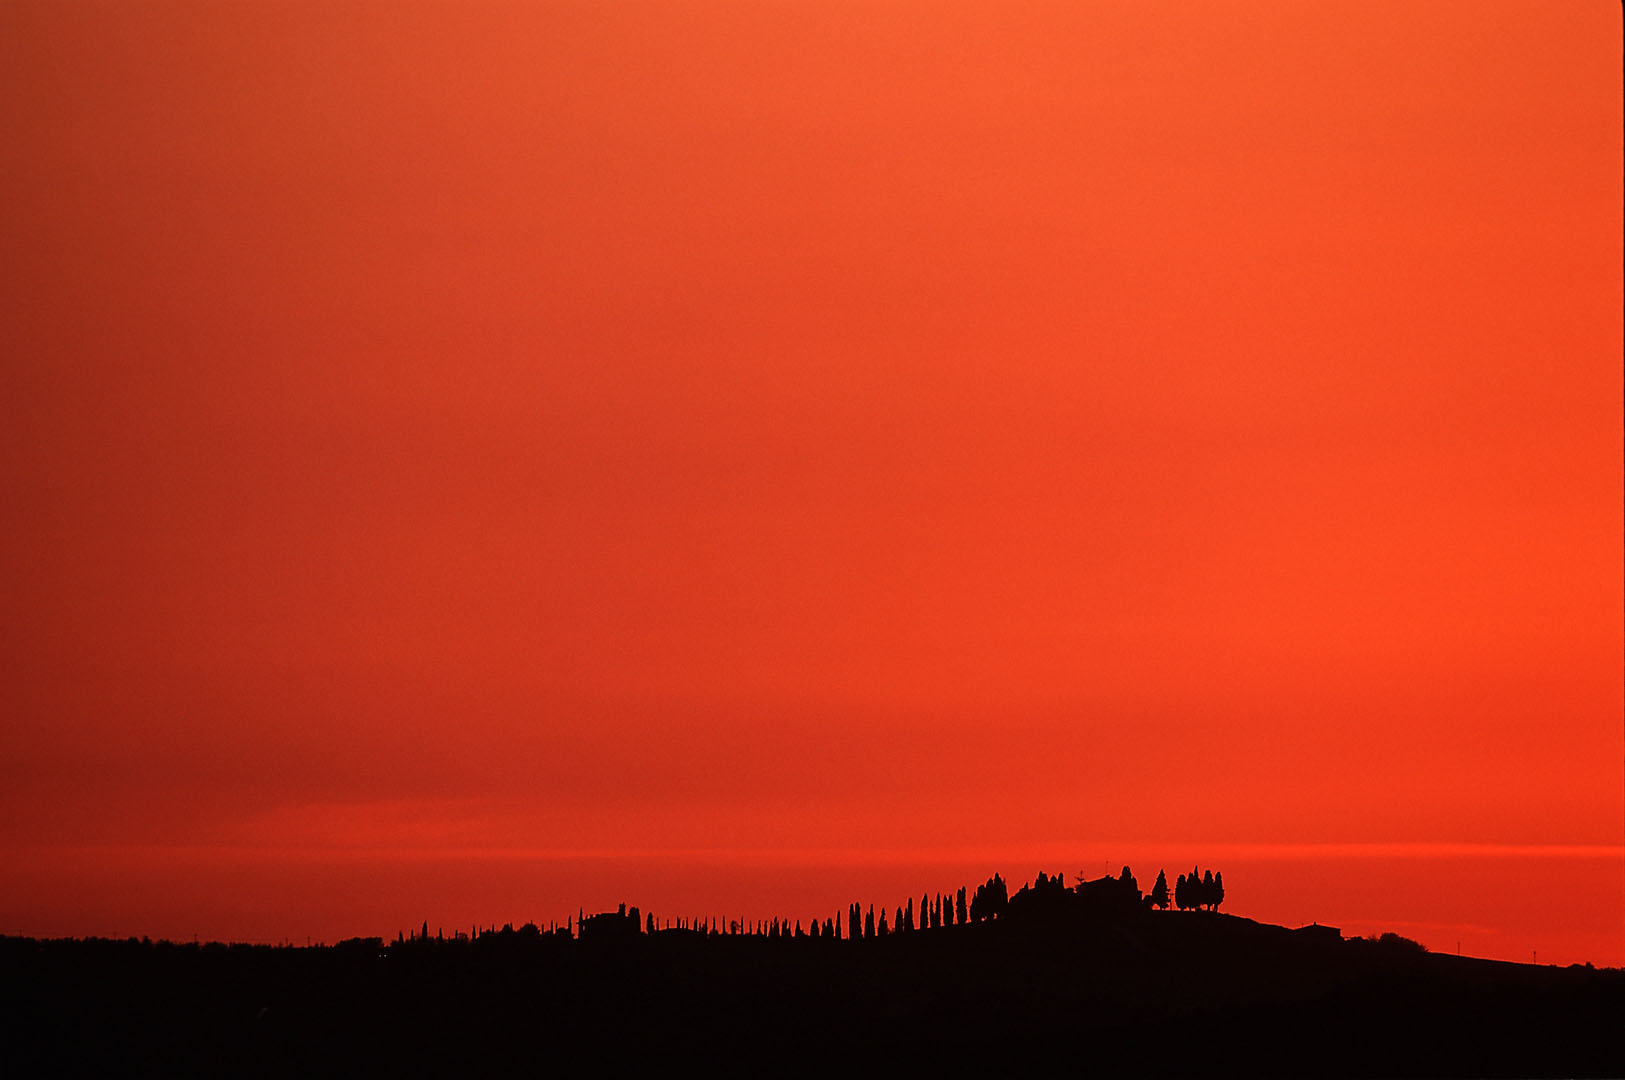
The picture above was taken with a “standard” focal length which roughly approximates what the eye sees. But if I had used a telephoto lens just to zoom in on the bright area, the result would have been less realistic but more dramatic. The photograph of the Val d’Orcia below shows how, with a long telephoto lens, you can take that to extremes – if that is the sort of thing you like.
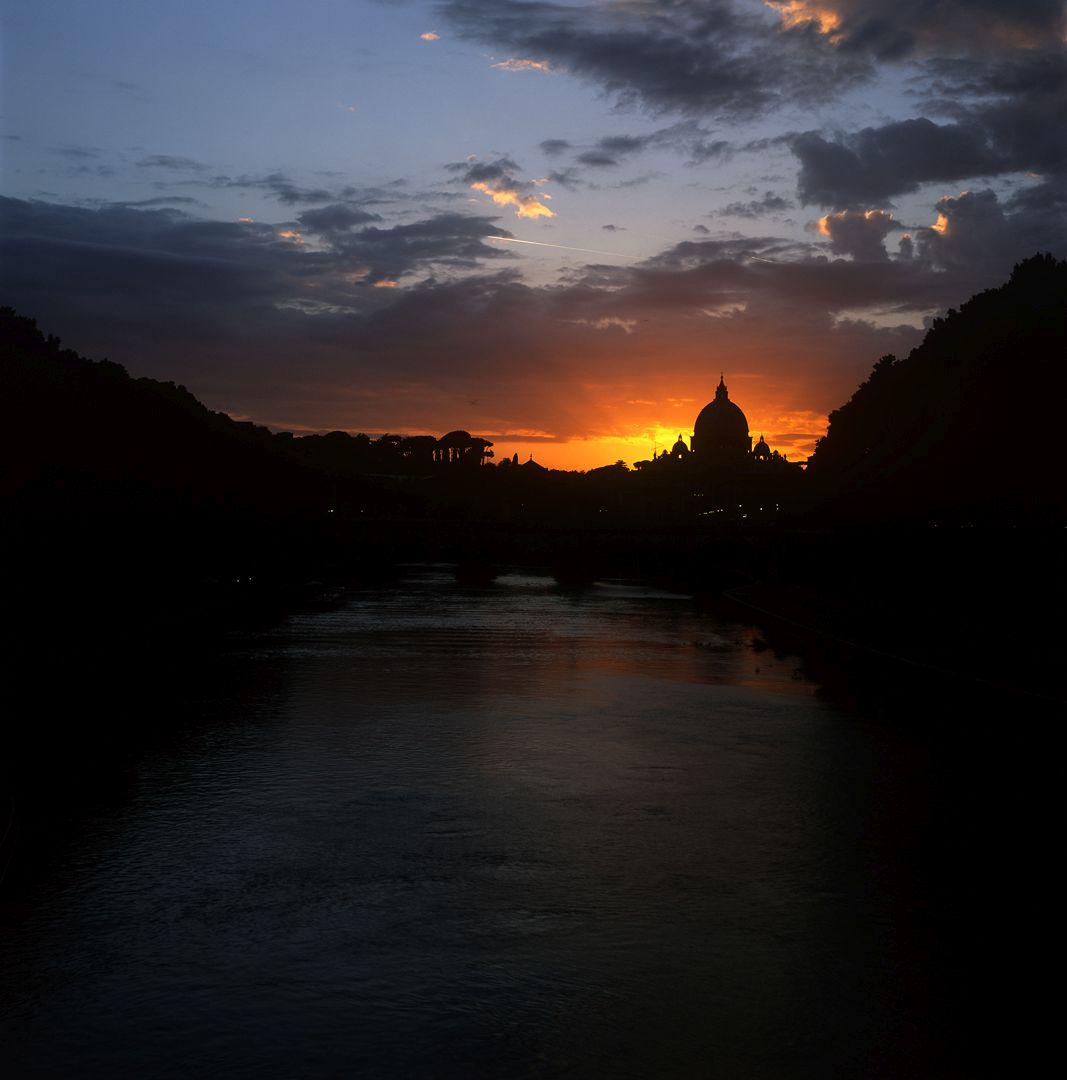
The picture below of St Peter’s in Rome demonstrates a similar effect, although this time with some foreground detail. The “starburst” effect on the streetlights is not the result of a filter, but of the type of aperture used in large format lenses. The long exposure has smoothed the surface of the Tiber.
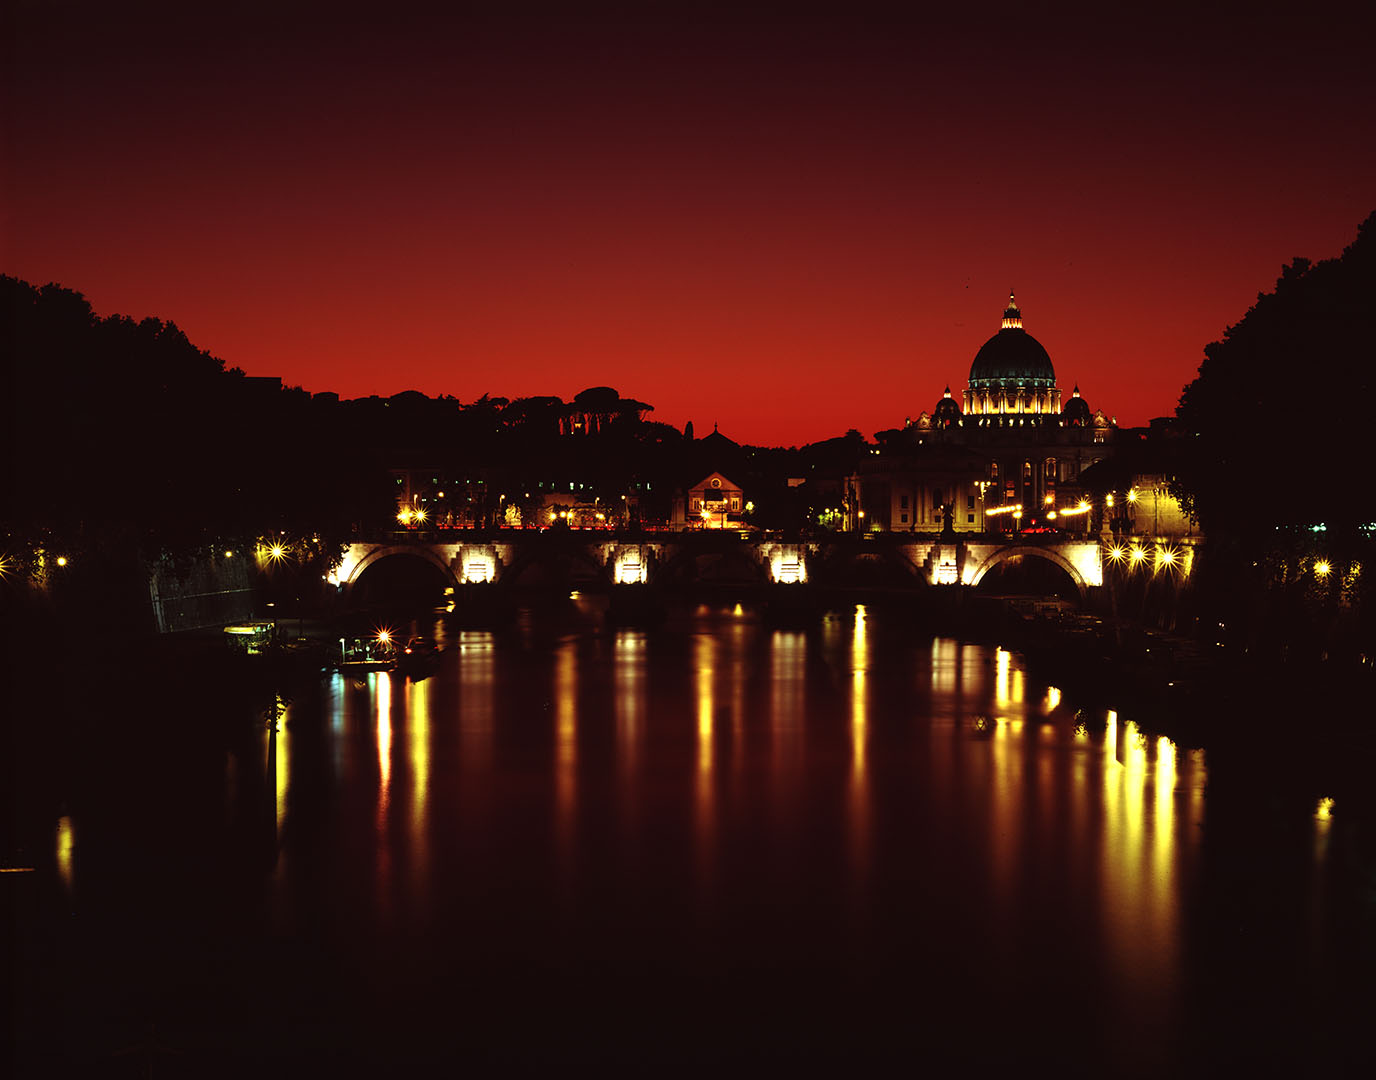
From memory, that photograph needed an exposure of almost ten minutes, given the slow film and the very small aperture I was using. Onlookers on either side took quite an interest, so I had to do my best to avoid anyone knocking the tripod. Halfway through the exposure, one of Rome’s ubiquitous hawkers tried to sell me a selfie stick but I explained to him that my camera was too big and heavy for that.
When you have a distant silhouetted skyline, as in the photograph above, it is important that it be sharp. But to focus at infinity, while giving you that sharpness in the distance, would throw the foreground out of focus. The solution is to focus on the “hyperfocal distance”. The exact calculation of hyperfocal distance, and why it is important, is explained here, but a rule of thumb is to focus about a third of the way into the area you wish to be in focus, and use focus guides on your lens, if it has them, to give you an indication of the closest and furthest points that will be acceptably sharp at your chosen aperture. Some modern cameras will give you an indication of the range of sharp focus on the display, but I always like to see focus guides on a lens.
After sunset, as the light fades, there will come a point where everything is lost in shadow. But before that there will be a brief period, perhaps only a couple of minutes, when the intensity of both sky and ground is similar enough to capture detail and colour in both. Exactly when that is will depend on various things, including how bright it is in the areas you want to capture. In the photograph below I wanted to roughly balance the sky, the lights strung between the lamp posts, and the interior of the shop. Although it was still quite crowded, the people walking along the quayside are largely lost in the shadows, giving a sense of peace.
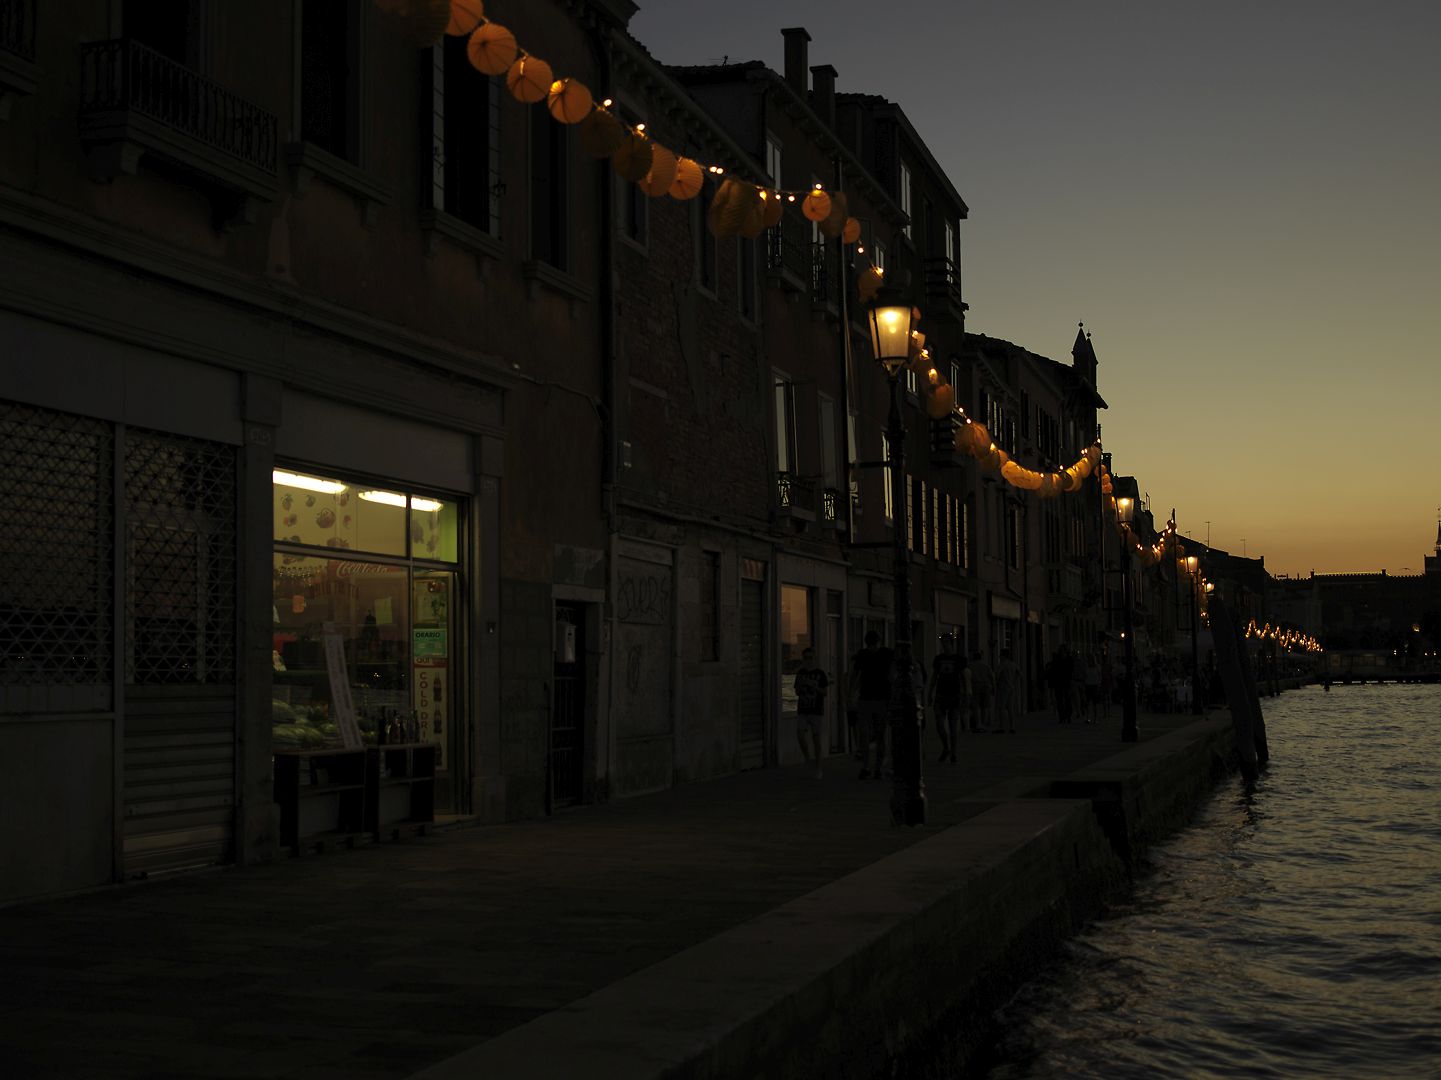
If you are not sure, a hand-held spot meter reading from all areas you wish to capture will help. My meter even has an function which allows you to take spot readings from multiple sources and then gives you an average exposure value. High-end modern SLRs can do the same thing in-camera. But I have to admit that in this picture I guessed – the more experience you have, the more likely you are to guess right. And if you are using digital, it costs you nothing to try various settings.
This final photograph in the set was quite challenging to take. I was set up on the Riva degli Schiavoni in Venice, which is one of the busiest areas, just near the Doge’s Palace. It was around 8pm, so there were still many people about, but I couldn’t leave it any later without the sky fading to black. My calculated exposure was around 10 minutes, and there was no way that I could go that long without other people wandering into the shot, or, even if they were out of shot, taking flash photographs which would have reflected off the nearer objects.
So I set the camera up, and started the exposure, timed with a stopwatch. Whenever it looked as if someone was about to wander in front of me, or was getting ready to take a flash photograph, I closed the shutter and stopped the stopwatch. When the coast was clear, I re-opened the shutter and restarted the stopwatch. All up, my ten-minute exposure took more than half an hour.
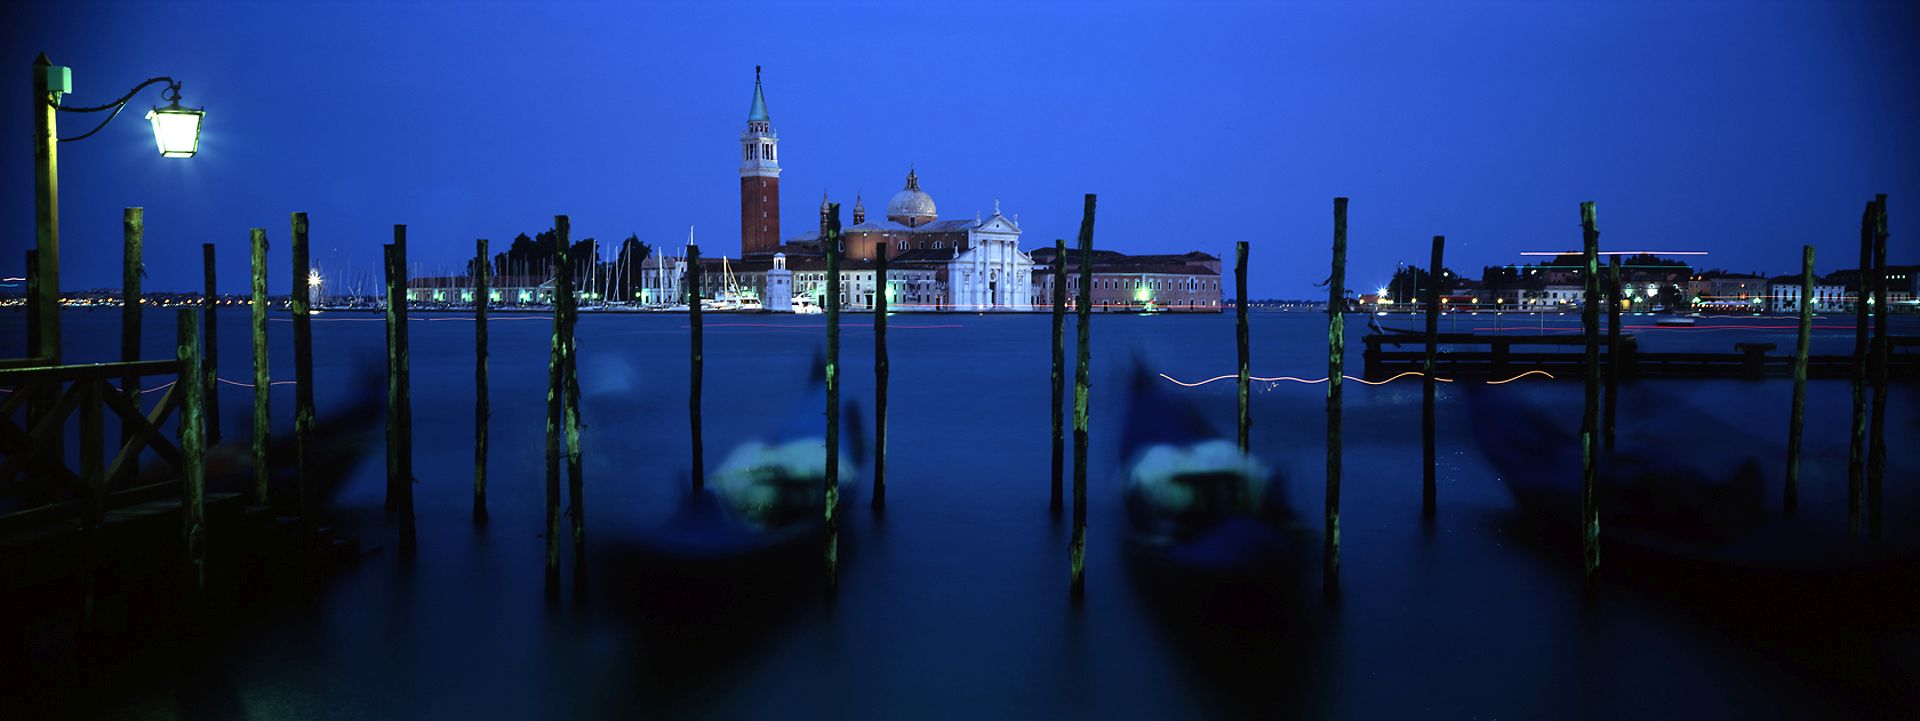
The long exposure necessarily produced some artefacts. Obviously, the rocking of the gondolas blurred their outlines. The faint white blur about a third of the way over from the left is the shirt of a gondolier who climbed onto his boat and rowed away. Various bright horizontal streaks mark the passage of the lights on vaporetti and other craft. And the wavy bright line to the right of the centre is made by the light on the back of a gondola that was being rowed along.
Is it a “realistic” photograph? Probably not in any technical sense of the word. But to me it does bring back the mood of that evening rather powerfully. And I really only make photographs to please myself, so I guess that makes it a success.
One Reply to “Evening Photography: Rome, Venice and Tuscany”